PicsArt is a powerful photo editing app that offers a wide range of tools for creating, enhancing, and modifying images. If you’ve added a face mask to a photo and wish to remove it, don’t worry—it’s easy. Whether the mask was applied as part of a filter, effect, or manually edited, this guide will walk you through the steps to remove it with ease.
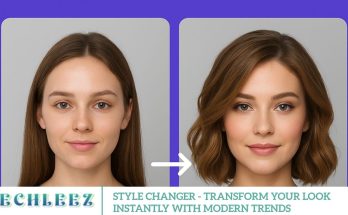
PicsArt, a widely used photo editing app, provides a variety of creative tools to enhance your images. One of its fun features is the ability to add face masks to your photos, adding dramatic or playful elements to your edits. However, there may be moments when you need to remove a face mask to create a different effect or reveal the natural beauty of the photo. In this guide, we’ll walk you through the step-by-step process of removing a face mask in PicsArt and share helpful tips for achieving a flawless result.
Face Masks In Picsart
PicsArt, a face mask can be an overlay, sticker, or effect added to a photo. These masks may include decorative elements, textures, or even augmented reality (AR) effects. While applying them is enjoyable, knowing how to remove them is just as important—especially if you need to revert the image or make additional edits.
Steps To Remove A Face Mask In Picsart
Open The Image In Picsart
- Open the PicsArt app on your device.
- Tap the “+” icon to upload the photo you want to edit.
- Choose the image that contains the face mask you’d like to remove.
Identify The Face Mask Layer
- If you’re working on a project with multiple layers, tap the Layers icon (typically located at the bottom right).
- Find the layer where the face mask is applied. Layers are usually labeled by their type, such as stickers, overlays, or effects.
Remove The Mask
Depending on how the face mask was applied, follow the corresponding method:
If The Mask Is A Sticker Or Overlay
- Please tap on the face mask sticker or overlay to select it.
- Then, press the “Delete” or Trash icon to remove it from the image.
If The Mask Is An Effect
- Tap the Effects button in the bottom toolbar.
- Scroll through the list of applied effects and find the face mask effect.
- Select the effect and tap “Remove” or turn it off to remove the mask from your image.
If The Mask Is A Drawn Element
- Tap the Draw tool to enter editing mode.
- Select the Eraser Tool and manually erase the mask by brushing over it.
Refine The Image
- Once the mask is removed, use tools like Heal, Clone, or Blur to clean up any leftover artifacts or residual elements.
- You can also adjust the brightness, contrast, or saturation to ensure the image looks smooth and natural.
Save The Edited Image
- When you’re satisfied with the edit, tap the Export button (usually located in the top-right corner).
- Save the image to your device or share it directly on social media.
Tips For Removing A Face Mask In Picsart
Work with Layers: Ensure the face mask is applied as a separate layer for easier and non-destructive editing.
Zoom In for Precision: Zoom in on the face when erasing or refining to ensure you’re only removing the mask without affecting the background.
Use Undo If Needed: If you make a mistake during the editing process, use PicsArt’s undo option.
Backup Original: Before making any changes, duplicate the original image to keep a backup for safety.
Touch Up the Background
While the focus is on the face, removing the mask may affect the background, especially if it is blending into it. To address this:
- Blur the Background: If the background appears too sharp or detailed, use the Blur Tool to create a soft, out-of-focus effect, directing attention to the face as the primary subject of the photo.
- Fill Missing Gaps: If any gaps or missing parts of the background remain after removing the mask, use the Clone Tool or Cutout Tool to restore the textures and fill in the missing areas.
Fine-tune the Skin Tone and Texture
Once the face mask is removed, you may need to adjust the skin tone or texture to make the edited area look more realistic. Here’s how:
- Tap Beautify from the bottom menu and select Smooth to soften the skin texture.
- Adjust the intensity of the smoothness using the slider.
- You can also use the Whiten tool if necessary to even out the skin tone around the edited area.
Zoom in and Inspect Your Work
To ensure that the face mask is entirely removed and that the image looks flawless, zoom in to inspect your work. Look for any inconsistencies, rough edges, or areas where the clone or healing tool may need further adjustments.
- Use the Undo and Redo buttons if needed to perfect your work.
- Make sure the transition between the face and background is smooth and natural.
Save and Export Your Image
Once you’re satisfied with the result, it’s time to save and export your edited image. Here’s how:
- Tap the Checkmark icon at the top right corner of the screen to finalize your edits.
- Tap the Download icon to save the edited photo to your gallery.
- If you wish to share the photo directly, you can also choose to post it on social media platforms such as Instagram, Facebook, or Twitter from within the PicsArt app.
Pro Tips for a More Seamless Edit:
- Work in Layers: If you’re working on a complex image, consider using the layers feature in PicsArt. This will allow you to work on different parts of the image separately, making it easier to adjust areas without affecting the entire photo.
- Use the Masking Tool for Precision: The Masking Tool helps you create sharp edges and blend the cloned or healed areas more effectively. It can be beneficial when dealing with complex or small areas around the eyes or nose.
- Adjust Brightness and Contrast: After removing the mask, the image may look a little off in terms of lighting. Adjust the brightness and contrast using the Adjust tool to ensure the final image looks cohesive.
Frequently Asked Questions
Can I remove a face mask from any photo in PicsArt?
Yes, PicsArt’s tools, such as the Clone and Healing tools, allow you to remove face masks from any photo, provided you have a high-quality image with good resolution.
How do I make sure my edits look natural?
To make your edits look seamless, use a combination of the Clone Tool and Healing Tool, and adjust the skin tone and texture to match the surrounding areas.
Are there any other apps that can remove a face mask from photos?
While PicsArt is a great choice, other apps, such as Adobe Photoshop Express, Snapseed, and Facetune, can also be used to remove objects from photos.
Conclusion
Removing a face mask from a photo in PicsArt can seem daunting at first, but with the right tools and techniques, it becomes a straightforward task. By following these simple steps, you can remove unwanted masks or other objects from your images, creating stunning, natural-looking photos. Remember to practice and experiment w